15 December 2011

Terrarium Replanting

If you've been following my blog for more than 6 months, you'll remember how proud and excited I was when I planted my terrariums.  For those behind the times, here's the original post.

Unfortunately, a few of the plants didn't make it more than a couple months, okay one month...  This is how I felt:


I put all of my faith in watering them, figuring if water couldn't save them, what could?


Brilliant plan, as you can see.

After letting the dead plants sit for a good month (okay, two), I got around to replanting them last weekend.


Once again, I put a layer of rocks (left overs and reused from the Dollar Tree) in the bottom for drainage.

And here they all are in their new, happy (I hope) homes.


As you can see, I saved a couple dinosaurs from the first terrarium planting, but a tiger stalked and ate the rest.  Poor tiny dinos.

I bought the patterned blue vase and the large clear vase from a local thrift store, the bowl vase on sale at Michael's during the first terrarium planting, and the light blue and salmon pots half off at Joann Fabrics last weekend.


A lovely shot of our Christmas fireplace, Christmas tree, and a grumbly pup who just wants to go for a walk.

14 December 2011

Peanut Butter Cookies for Dogs

Words on Wednesday will be back next week.  Today, I'm continuing to share my holiday baked goods with you.

I won't lie, I love my dog.  (As I write this, she's having an intense, barking dream on her new bed.)  I completely spoil her.  4 out of 5 Target trips I come home with a new toy for her, which means we have about 40 dog toys lying around.  (She's not the kind of dog who rips up her toys, so they last a lot longer than most.)

As most of our friends are just as crazy about their pups, I opted to bake up a couple varieties of dog treats, along with the human treats I've been whipping up.  Here's today's recipe:

Peanut Butter Cookies (for Dogs)

Ingredients

Vegetable Oil/Non-stick cooking spray
1 cup unbleached all-purpose flour, plus more for rolling
1 cup natural peanut butter
1 cup skim milk
1/2 cup chopped peanut, walnuts, or pecans (optional)
1 cup whole wheat flour
1 tablespoon baking powder

Preheat the oven to 375 degrees.  Lightly grease cookie sheet.


Mix peanut butter and milk until smooth.  Add the nuts, if using (I was lazy and didn't feel like chopping peanuts).  Add the flours and baking powder and mix until it forms a ball.


Place the dough on a lightly floured surface and knead until smooth.  Roll out into 1/4-inch thickness and cut with a bone-shaped cookie cutter (or any other cookie cutter you have handy, like holiday-themed cookie cutters) or scoop tablespoon-size balls onto the sheet and flatten with your palm.  Place 2 inches apart on the prepared cookie sheets.  Bake until lightly browned, about 20 minutes.  Set aside to cool.


Store in an airtight contained in the refrigerator up to 3 weeks.  Bring to room temperature before serving.

Yields approximately 36-48 cookies.  I doubled the recipe, so I have a LOT of cookies in my fridge waiting to be handed out.


It was very difficult to get a picture of Shadow with the treat in front of her nose without her eating it up right away.  She only has so much self-control and she really liked these treats.


Tomorrow: A break from the recipes to show you how my terrariums progressed (I'll give you a hint, not well) and what I did to revamp 'em.

13 December 2011

Gingerbread Softies

These cookies are AMAZING!

Seriously.  And they are super easy to whip up, which is my favorite kind of cookie.  The fewer the steps, the happier the Mo.

Gingerbread Softies


Ingredients

2 cups sugar
1 1/2 cups shortening
2 eggs
1/2 cup molasses

4 cups flour
4 tsp baking soda
2 tsp cinnamon
2 tsp ginger
1/2 tsp cloves
1/2 tsp salt

Preheat oven to 350 degrees.

Cream together the sugar and shortening.  Add eggs and beat until thick.  Add molasses and stir until combined.

Isn't my girl so pretty?
Sift together flour, baking soda, cinnamon, ginger, cloves, and salt.  Add to creamed mixture and stir just until blended.  If dough is very soft, wrap in plastic wrap and chill in freezer for 30 minutes.

Anything rolled in sugar is going to be delicious, and you know it.

Shape into 1-inch balls and roll in granulated sugar.  Place on greased cookie sheets.  Bake 7-10 minutes or just until set, but before they start to brown.  Mine were perfect at 8 minutes.


I stuck mine in the freezer as soon as they were cool, otherwise I'd eat every last one.  Happy baking, INM readers!

12 December 2011

Oatmeal Chocolate Chip Cookies

I have probably made these cookies for almost every party or holiday in 2011, including Valentine's Day.  They are a definite crowd pleaser, and with seasonal M&Ms they work with every holiday.


Oatmeal Chocolate Chip Cookies
Or Oatmeal Anything Cookies
Betty Crocker Cookies: 100 Favorite Recipes

Ingredients

2/3 cup granulated sugar
2/3 cup packed brown sugar
1/2 cup butter, softened
1/2 cup shortening
1 tsp baking soda
1 tsp cinnamon
1 tsp vanilla
1/2 tsp baking powder
1/2 tsp salt
2 eggs

3 cups oats (quick-cooking or old-fashioned)
1 cup flour
1-2 cups add-ins (M&Ms, chocolate chips, raisins, nuts)
For this batch, I did 1 cup M&Ms and 1/2 cup semi-sweet chocolate chips.  I've also made these with 1 cup chocolate chips and 1/2 cup toffee bits.  I would say don't go over 2 cups of add-ins.

Preheat oven to 375 degrees.

In a large bowl, beat all ingredients except oats, flour, and add-ins with electric mixer on medium speed.  Stir in oats, flour, and add-ins.


On ungreased cookie sheets, drop dough by rounded tablespoons (or, if you're me, huge globs) about 2 inches apart.

Bake 9-11 minutes, or until light brown.  Immediately remove from cookie sheet to cooling rack.


Enjoy warm, dipped in milk, or they're just as good at room temperature.  Maybe in a bowl of ice cream...with some whipped cream on top...

08 December 2011

Chocolate Cupcakes + Cream Cheese Frosting

Because, well, who doesn't love cupcakes?

This recipe may not be holiday related, but I've been craving these for a while now.  The Chocolate Cake and Cream Cheese Frosting recipes are both from the beloved Better Homes & Gardens Cookbook.


Chocolate Cake
Better Homes & Gardens Cook Book

3/4 cup butter
3 eggs
2 cups flour
3/4 cup unsweetened cocoa powder
1 tsp baking soda
3/4 tsp baking powder
1/2 tsp salt
2 cups sugar
2 tsp vanilla
1 1/2 cup milk

Allow eggs & butter to stand for 30 minutes.  Prepare cupcake pan or grease bottom of 2 round cake pans & lightly flour.  (As this is a chocolate cake, flour the pan with cocoa powder!)  Set aside.

Preheat oven to 350 degrees.

In a medium bowl stir together flour, cocoa powder, baking soda, baking powder, and salt.  Set aside


In a large mixing bowl beat butter on medium to high speed for 30 seconds.  Gradually add sugar, 1/2 cup at a time, beating on medium speed until well-combined.  Scrape sides of bowl; beat 2 minutes.  Add eggs 1 at a time, beating after each addition.  Beat in vanilla.


Alternatively add flour mixture & milk to butter mixture, beating on low speed after each addition until combined.  Beat on medium to high speed for 20 more seconds.  Spread into prepared pans or scoop into cupcake tins.


Bake 30-35 minutes for cake, 20-25 minutes for cupcakes or until toothpick comes out clean.  Cool in pans on cooling rack for 10 minutes.  Remove from pans and cool.


Cream Cheese Frosting
Better Homes & Gardens Cook Book

1 8-oz package cream cheese, softened
1/2 cup butter, softened
2 tsp vanilla
4 1/2-5 1/2 cups powdered sugar

In a large mixing bowl, beat cream cheese, butter, & vanilla on medium speed until light and fluffy.  Gradually beat in powdered sugar to reach spreading consistency.  This time I used about 5 cups, but I prefer a little bit sweeter frosting, so you may want less.  Don't be afraid to taste test while you're mixing!

This also makes way more frosting than I have ever used, so I suggest topping off your regular snacks with it: ice cream + frosting, chocolate chip cookies + frosting, and my personal favorite stew + frosting.  Just kidding...or am I?


Your eyes don't deceive you, that is a hammer, bottle of rubbing alcohol, and the lining of a helmet in the background.  Our kitchen counter tends to have a random assortment of junk on it.  Don't judge me.

I have already eaten far too many (7...okay maybe 8) of these in 48 hours, again, don't you judge me.  They're delicious.

In yo' face!

07 December 2011

Words on Wednesday: Pleasantries

Now that it is socially acceptable to listen to Christmas music, I've been rocking out while cooking, cleaning, class working, caravaning, colluding, and any other appropriate alliteration-ing.  Check out Pandora's "She & Him (Christmas)" station - loving it right now.  I have also begun my holiday baking with my new, most favoritest, awesomest, glorious...est kitchen gadget!


That's right.  I am officially a registered Kitchen Aid Stand Mixer owner, and I couldn't be happier.  She's so shiny and blue.  I'm pondering a good name for her, as I consider her to be a family member (Tyson may not, but since when does he have a say?).  Hit the comments with your suggestions.

In honor of my blue beauty's arrival and Christmas music, I have chosen this week's Word on Wednesday!

dulcet, adj. 
        
        1. pleasant to the ear; melodious: the dulcet tones of the cello.
        2. pleasant or agreeable to the eye or the feelings; soothing.
        3. Archaic . sweet to the taste or smell.
             Origin: 1350–1400;  obsolete dulce  (< Latin,  neuter of dulcis  sweet)

This week's WoW adapted from Dictionary.com.

Check back tomorrow for shots of my girl in action whipping up her first batch of dulcet delicacies: Chocolate cupcakes with Cream Cheese Frosting!

I have also been crocheting up a storm, so keep an eye out for a few crochet-centric posts.

05 December 2011

Holiday Baking Line-up

I am thisclose to being done with the third quarter (out of five) of my Master of Library and Information Science!  Very exciting, but even more exciting is the holiday baking that is about to take over my kitchen.  Cookies, cupcakes, bars, and dog treats are all on my to-do list.  (Too bad I don't have a fancy Kitchenaid Stand Mixer....yet...)  Tomorrow, I will be hitting up the store for all my baking needs, so today I'm sharing the starting line-up for Christmas 2011.

Dog Treats
Shadow rolls with a pretty tight crew of pups, so a few homemade treats with a nice Christmas bow will be perfect gifts.
1. Cinnamon Bites
2. Peanut Butter Cookies
3. Puppy Power Treats
All three recipes come from Throw Me a Bone by Cooper Gillespie with Sally Sampson.  It was an impulse buy over a year ago that I just found sitting with the rest of my recipe books.  This will be my first venture into homemade dog treats and I'm pretty excited.

Human Treats
1. Peppermint Bark
2. Graham Bars
3. Candy Cane Cookies
4. Mint Chocolate Chip Cookies
5. Sugar Cookies
6. Pinwheels
7. Gingerbread Softies
8. Plain, old Chocolate Cupcakes with Cream Cheese Frosting (Because I'm a fatty, and have been craving them for weeks.)

Our lovely (fake) Christmas tree.

Here's hoping I can:
1. actually whip all of these up
2. not gain 30 pounds in the process.

Enjoy your week, INM readers.  Keep an eye out for recipe posts with pictures and a new Words on Wednesday.

29 November 2011

Words on Wednesday: A Brilliant Mind

I am in the midst of writing final papers, so this week's WoW will be brief.  This interview with noted linguist Steven Pinker was on the Frontpage of the New York Times website yesterday.  Take a few minutes to listen to a brilliant man.  You just might learn something new!


This week's Word on Wednesday is inspired by Dr. Pinker and his works:


oeuvre, noun
          a substantial body of work constituting the lifework of a writer, an artist, or a composer
                    origin: French Å“uvre, literally, work, from Old French ovre, Latin opera
                    First Known Use: 1875


This week's definition taken from Merriam-Webster Dictionary.  Click the link for the pronunciation!  Not going to lie, I love words with three vowels in a row.  I don't know if I like how it looks or figuring out how to pronounce them, just love 'em.  Thanks for loaning us this lovely word, French!

23 November 2011

Words on Wednesday: Gratitude

As Thanksgiving is tomorrow, I had to make this week's Word on Wednesday theme gratitude.  Too often we don't acknowledge and say thanks for those people, moments, things, etc in our lives that have affected us positively, even simple "Thank you" notes are too much for people nowadays.

1. My husband.  He is always patient and kind, even when I'm not.
2. My beasts.  When I'm stressed or feeling down, they break out in a ridiculous rough and tumble wrestling match that always puts a smile on my face.
3. My brothers.  We may be a thousand miles apart, but I always feel like I'm home when I talk to them.
4. My parents.  They understand - "We could not talk or talk for hours, and still find things to not talk about." - Name that movie.
5. Friends, near and far.  It's always great to talk to people who have known me for years, but I've loved meeting and getting to know more women who are dealing with the same issues I am.

Found here


Hit the jump for 6-10 and this week's festive WoW!

16 November 2011

Words on Wednesday: Memories

I have many memories that revolve around words.  My father used to play the Dictionary game.  We would flip through the dictionary and try to stump him on a word's definition.  Rarely did we find a word he couldn't define.  In high school, my number one, most favorite teacher (aka "Mom") would post a new Word of the Day on her blackboard.  Fast forward to Christmas 2009 and she gifted me a stocking stuffer Word of the Day desk calendar that I happily popped on our small apartment's kitchen counter where I'd see it every morning.

Not only are these fond memories, but they were fun ways my parents found to expand our vocabularies.  You're never too young to learn new words!

Be like Cher and Tai, don't use new vocabulary sporadically.  Read on for this week's Words on Wednesday!

11 November 2011

I'm a Hooker Now

Word play!

I don't know what it was that inspired me, but a month ago I made the decision that I was going to learn how to crochet.  I immediately went to Joann Fabrics, bought myself the variety pack of crochet needles and a skein of yarn.

Susan Bates Crochet Hook Set.  My set is rainbow colors & way more fun than this.
My timing could not have been more perfect.  The archivist where I work informed me that she had recently started a monthly "Fiber Time" gathering.  It is a knitting/sewing/fiber working get together for anyone in the area to show off what they're working on, get advice, and enjoy each other's company.  The archivists enthusiastically offered to teach me how to crochet at the next meeting.  As I told her I'd definitely be there, a part of me wondered if I'd turned into an adorable 90 year old recently.  Boy, am I glad I ignored that annoying part of my brain.


Check out the pattern after the jump...

09 November 2011

Words on Wednesday

I am a huge fan of the English language.  Yes, I am a badge carrying member of the Grammar Police.

But, when I'm not being obnoxious about the little things, I'm soaking up the beauty of words.  I majored in Linguistics in college, which I chose because of this love for language and it wound up only making me love language more.  Let me clear a few things up for you, after the jump:

04 November 2011

It's a Planket!

I have about 10 different projects floating around the house that I've been meaning to complete, but haven't gotten around to.  I'm great with excuses and procrastination.

There were no excuses for this project, though.  It was going out as a birthday gift for the little guy I babysit, which meant it had to be done yesterday.  Here it is!


 It's a pillow - it's a blanket - it's a planket!  

The inspiration and seriously simple  tutorial came from here.  I wanted to make something special for the little guy's second birthday, and when I saw this, I knew it was meant to be.  He loves being outside and watching his dad play lacrosse, so this is perfect.  It can be used as a pillow for cold bleacher (anyone else think 'bleacher' doesn't look right?) seats or as a blanket for sitting in the grass.

Unfortunately, I totally forgot to snap a pic of it unfolded, but hit the link to the tutorial and you'll understand the magic of the planket.

I wanted to challenge myself a little, so I decided to monogram his initials on with a zig-zag stitch.  Let's just say, it wasn't perfect...


But for a first go, I don't think it looks half bad.  Yes, my letters are a wonky, the seams are a bit...wild, and my J is teeny, but I love it.  It's hard not to love something that you put your blood, sweat, and tears into.  Okay, maybe no blood or tears, but I started out with a sweater on, and finished in a tank top.

I'd love to hear what you've recently made that's not perfect, but you love it anyway!  Leave a comment.

31 October 2011

Happy Halloween!


Happy Halloween!
Keep an eye out for scary beasts today!

26 October 2011

Beautiful Barbie

Whatever your thoughts are on Barbie and her teeny, tiny waist, you have to admit that this is beautiful:

SilkstoneMidnightMischief
Found here

She oozes confidence in this illustration.  I absolutely love it.  Unfortunately, this print is not available in the limited edition prints set.  Boo!  I'd have to say this one is a close second, though.

I also love that this Barbie is a red head.

I must have a thing for pink and black.  Totally in love with these beautiful prints.  If you're a Barbie fan, check out the rest!

24 October 2011

Puppy Love

I think I'm in love...don't tell my husband.

Wood & Faulk


I don't care if this is marketed for men.  It's so pretty!  I just want to hold it.  And pet it.  And rub my cheek against it.  Am I getting creepy? Maybe.  Do I have an unhealthy obsession with handbags?  My husband would say yes.  I would beg to differ.

17 October 2011

Halloween DIY Porch Decor

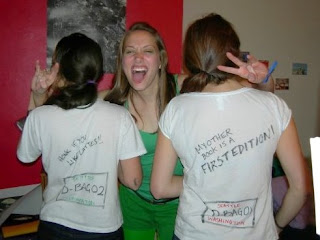
I've never been a big fan of getting dressed up for Halloween.  I was never one to wear the tight, way-too-short costumes in college just because.  Sophomore year I threw on a black shirt.  Junior year was the closest thing to a "slutty" costume; a cute white dress that I jazzed up with gold jewelry to become a Greek Goddess.  Senior year I was Buttercup in the Power Puff Girls, while two of my good friends opted to gender bend and became the men of pretentious, hipsters' dreams.
"Honk if you love lattes!"
"My other book is a first edition!"
I still don't like to get dressed up for Halloween, but now that we live in an actual home, I have really enjoyed decorating for the holiday.  This year, I decided to do a few little DIYs for the porch.


I got this great, bloody idea from Muse Lodge.  Sadly, I had some trouble really getting the full effect of the bloody windows, but they look awesome in person!

The husband kindly supplied a knife to up the scary factor for this photo shoot.

This one was seriously easy: lay out wax paper, splatter wax paper with "blood" (I used acrylic paint), let dry, and tape to windows.


I got the idea for these "Spirit Jugs" here.  The "spirits" are empty milk cartons I saved (the husband goes through 2 gallons a week, so this was an easy one).  Just be sure to wash them out well!  No one wants sour milk smelling ghosts.

I drew faces on them with a permanent marker, which, with my limited artistic abilities, means that there's a disfigured ghost in the recycling bin this week.

Finally, I cut out a hole in the back of each and stuck some string lights in them.

The black cat was working on killing a moth that couldn't resist the siren call of the ghosts.  A black cat and a moth death only make for an even better Halloween-themed front porch.  Thanks, Puss.  On a happy side note, this is his first Halloween with us.  A friend and her daughter found him hiding under a car while out Trick-or-Treating last year.  He was barely a pound and had been out there for at least a week.  Now he's thriving, and eating us out of house and home.  And attacking my feet while I sleep, but I still love him.

So little once.  Happy (belated) First Birthday, Black Lightning.

We also have two 20 pound pumpkins and a few smaller pumpkins that will soon grace the porch, as well.  Sadly, it still gets a little too hot during the day for me to put them out in direct sunlight this far from Halloween.

Up Next:  Halloween Mantle Decor.  A few tweaks need to be done, although I'm not sure why I tweak since anything crafty that I do always looks like a 5 year old did it at summer camp.

14 October 2011

Friday is for Flowers

I love flowers.  I'm having trouble committing to permanent pops of color in our house, so flowers are perfect.  I don't get them every week, but I have been on a kick lately.

While at the grocery store yesterday, I grabbed a few bouquets of fall colors.


I bought the red flowers last week, and they have held up very well, so they were included with my beautiful sunflowers and the purple flowers.  (Notice how in one day I've completely forgotten what the names of the flowers are...)
A glimpse at my Halloween mantle!


The sunflowers have really opened up since I took these pictures and look fantastic.  Everywhere I look now there are flowers.  What a day brightener!

For those who are super observant, the terrarium is down a plant.  I went to water it about 2 weeks ago, and the stem was brown and rotted.  Same thing has happened to 2 other plants in my larger terrarium.  I wish I knew what went wrong.  The aloe plant is thriving, so I like to think it's not all my fault.

12 October 2011

Red Reveal: Chalkboard Frame!

Here it is.  The moment you've all been waiting for.  The red reveal!

I have been seeing a ton of great chalkboard revamps and creations on the blog-o-sphere lately.
Like this crib into a chalkboard easel revamp from The Red Kitchen

And this adorable chalkboard plaque from My So Called Green Life


After seeing these beauties, I decided to give it a shot.  Here's my DIY Chalkboard Frame:
Please note that I am currently the Dominos champion.
We created this beauty for our (soon-to-be) games area.  It was extremely easy!

Here's what we used:
plywood
trim
chalkboard spray paint
spray paint
finishing nails & screw eyes (for hanging)
The most expensive item was the chalkboard paint for $8.  The whole project cost around 20 dollars.

I tasked my husband with cutting the plywood and trim to size for me.  We wanted it to be a bit large since we play a lot of games, so ours is 17"x24".  You can make one larger or smaller depending on your preferences.

I then went to spray paint town.

Population: Cool

I first gave everything 2 light coats of primer.  Then I gave the trim 2 light coats of red paint (Valspar Classic Red) and the plywood got 3 light coats of chalkboard paint (Rustoleum).

After a 24 hour drying period, the helpful husband nailed in some finishing nails, twisted the screw eyes in the back, and we hung her up.  We (foolishly) did not sand the plywood enough, so the chalk dust collects in a few little nooks.  If you do attempt this, make sure you sand really well (and leave a comment with your project)!

Sadly, the games area is pretty empty (the space below the frame used to house my pile of waiting-to-be donated clothes).  I am currently scouring Craigslist and will be hitting up garage sales this weekend to hunt down a small bookcase to fill the corner.  Get excited!

Sad, empty corner.

I'd love to hear your thoughts on our chalkboard frame, so please leave a comment!

09 October 2011

Red Sneak Peek

I'm really excited to show you what we made this weekend, but it isn't finished yet!  Here's a hint at what's going down.  Can you guess what we're creating?


Hint: It will go in our board game area.

I've also got a great Halloween decor diy that I'm prepping now to show you later this week.  It is sort of awesome, so get pumped.

05 October 2011

Perfect Way to Start Your Day

Why does this not happen to me every morning, afternoon, evening, and night?


Currently, my dog hates me because she's spending her time either in a Cone of Shame and Sadness or with a sock taped to her foot.

She's not speaking to me at the moment.
That's what she gets for stomping on a fire ant hill and gnawing her foot to the point of infection.  On a serious note, she will survive and has been spoiled with rawhide (as evidenced by the above photograph).

01 October 2011

The Patience of Upholstering

About 9 months ago, I decided I was going to learn how to sew.  I convinced my always supportive husband that we needed to get a sewing machine, and excitedly signed up for Sewing 101 at Joann Fabric.  The class was fantastic.  If anyone is looking to get a beginner's lesson in anything from sewing to cake decorating to jewelry making, I highly recommend going there first.  I left the class feeling empowered and ready to be the best crafty housewife I could be.

Let me back this up a little bit, the reason I decided I wanted to learn how to sew was because I had ripped the upholstery off of my favorite reading chair without even buying it a drink first.  I started with great gusto, immediately reupholstering the ottoman by wrapping it up like a lovely Christmas present.  After looking at the construction and old upholstery, I realized that the only way to finish her off and make her look like a classy lady was to learn how to sew.

Before: Dirty on  the outside, but gloriously comfortable on the inside.

Flash forward to 5 months after she was ripped of her dignity and 4 months after my Sewing 101 class.  There she sat, naked on my back patio, untouched.  The patient husband had been quietly (and sometimes not so patiently) trying to get me to straighten my act up and bring her back to full lady status, but I had lost momentum and knew I would never get the chair done.  I did not take any pictures of her in her compromised state on the back patio.  No lady should have pictures on the internet looking like that.

Here is one of those moments where all I can say is "Wow, I really got a good one."  I went to visit my grandma up in the Great Northland for Fourth of July (everyone "aw" at what a great grandchild I am), and the patient husband took matters into his own hands.  When he leaves me alone for a week, I sit around and eat junk food.  When I leave for a weekend, he spends 3 straight days sewing and reupholstering my naked arm chair.  Hero cape, anyone?


After!  Isn't she pretty?
I love her.  I love my husband.  I'm spoiled.  He opted not to add a skirt because it would have been too difficult and he just wanted to get the chair done.  No complaints from me.

Chair   $0 (hand-me-down from my great grandma)
Fabric   $6/yard  (a steal at a shop that was closing)  We bought 9 yards, which gave us a lot of leftovers
Staple gun & staples    $20
Blood, sweat, and tears    Priceless

As usual, it isn't perfect (the patient husband may have sewn the zipper to the outside of the cushion case), but it was far less costly and a much better story than if we had paid someone hundreds of dollars.  She's a classy lady again!

I have been working on my sewing skills, and a post will follow to show off my pillow case making skills.