22 February 2012

Grammy's Chocolate Cookies

And then I was  procrastinating and a little depressed, which can only lead to one thing: baking.  My mom and I were talking about what we do when we're sad; she eats, I bake.  I'm not sure if we're perfectly made to be depressed together, or if we're a dangerous, fat-enabling duo.  Unfortunately, my mom isn't here to eat these cookies, so the task has been left to me.  I am a dangerous, one woman, fat-enabler.

Moving on...I decided to choose a cookie that didn't require me leaving the house, and these soft beauties were it!


Grammy's Chocolate Cookies

Hit the link for the recipe.  They're soft and delicious.  A few reviewers noted that they're perfect for add-ins: sliced almonds, mint chips, toffee bits.  Next time I make them, I'll have to spice them up a little.  I always prefer to experience a cookie for the first time without any fancy touches.


Did I mention they're rolled in sugar?  Reminds me of the Gingerbread Softies I made for the holidays.  The recipe calls for sanding sugar, but, come on, Martha, I ain't that fancy.


Not only am I getting great recipes out of my cookbooks, but I'm picking up tricks for my own food photography.

17 February 2012

Baby Shower: Purple Crochet Baby Hat

Let's bring this baby series to an end at the top...of the baby's head!

My baby shower gift to the mom-to-be was a crochet baby hat.  She wanted something with a little more pizzazz than a plain old beanie.  I searched through the patterns on Ravelry and Lion Brand for the perfect little girl's hat.


After sifting through about 20 different patterns I landed on this Violet Cloche.  You may need to be a member of Ravelry to see that link.  If you're a knitter or crocheter, it's well worth it to join! (And it's free)

It only took me about 4 hours and 5 restarts to get the hat to the size I felt was right.  I didn't follow the pattern exactly - I took out a row and had to readjust the shells as a result.


Once the hat was whipped up, I felt it was too plain, so I popped a little star on it.  The star pattern is also from Ravelry, A Garland of Stars or it can be found on the blog of the pattern's creator.

15 February 2012

Baby Shower: Cranberry Orange Pinwheels

This baby shower was a great opportunity to try baking new recipes.  I had never made a cake that wasn't chocolate or from the box before this party and I had never made pinwheel cookies.  Something about rolling out dough, mixing the filling, chilling it, and cutting it down to size turned me off.  Too many steps for this self-professed lazy baker?  Probably.

This party made me face my pinwheel fears and attack them head on!  I was so wrong about pinwheels.  They were super easy and yummy.  They are a crunchier cookie, which usually I'm not a fan of, but these were good.  A few people who tried them said they'd be great for a Thanksgiving treat - apparently cranberry is only allowed out in public when the turkey comes out.

Give em a try!


Cranberry-Orange Pinwheels
I highly recommend buying the BHG cookbook. :)

1 cup cranberries
1 cup pecans
¼ cup packed brown sugar
1 cup butter, softened
1 ½ cups granulated sugar
½ teaspoon baking powder
½ teaspoon salt
2 eggs
2 teaspoons finely shredded orange peel
3 ¼ cups all-purpose flour

1. For filling, in a blender container or food processor bowl combine cranberries, pecans, and brown sugar. Cover and blend or process until cranberries and nuts are finely chopped; set filling aside.

Hidden bonus: you get to eat a whole orange while making the pinwheels!
2. In a large mixing bowl beat butter with an electric mixer on medium to high speed for 30 seconds. Add granulated sugar, baking powder, and salt. Beat until combined, scraping sides of bowl occasionally. Beat in eggs and orange peel until combined. Beat in as much of the flour as you can with the mixer. Stir in any remaining flour. Divide dough in half. Cover and chill dough about 1 hour or until easy to handle.

3. Roll half of the dough between pieces of waxed paper into a 10-inch square. Spread half of the filling over dough square to within 1/2 inch of edges; roll up dough. Moisten edges; pinch to seal. Wrap in waxed paper or plastic wrap. Repeat with remaining dough and filling. Chill for 4 to 24 hours.

4. Cut rolls into 1/4-inch slices . Place slices 2 inches apart on an ungreased cookie sheet. Bake in a 375 degrees degree F oven for 8 to 10 minutes or until edges are firm and bottoms are lightly browned. Cool on cookie sheet for 1 minute. Transfer to a wire rack and let cool. Makes about 60 cookies


14 February 2012

Valentine's Day Sugar Cookies

Happy Valentine's Day to all!

More importantly, happy birthday to my awesome mother and to my adorable niece!

In honor of Valentine's Day (and my apparent need to bake something every week) I made sugar cookies over the weekend.


The heart cookie cutters were a gift, but I believe they're sold at Target.

The sugar cookie recipe can be found here - I Am Momma Hear Me Roar

I used the same buttercream frosting recipe from the Cherry Vanilla Cake - Allrecipes Easy Buttercream Frosting

When you're baking these - err on the side of caution and pull them out as soon as you think they're ready.  I left my first batch in a little too long and they're crunchy.  I learned my lesson and the rest were happy and soft.

13 February 2012

Baby Shower: Cherry Vanilla Cake

For the baby shower, I wanted all my baked goods to have pink or purple in some way.  An overkill of pink, one might say.

When I found this recipe for Cherry Vanilla Cake, I could not have been more excited.

Source Sprinkle Bakes
I'm not the biggest maraschino cherry fan, but they are barely perceptible in this cake.  I would say the cake is more Cherry Almond, as there is no vanilla in the cake itself, but almond.  The vanilla comes into play in the frosting.

I doubled the recipe since I had two 9" baking pans, and the recipe on the site is only for one 9" pan.  I also had made a test cake a few weeks prior to the shower and found out that splitting the single recipe into two pans yielded cakes that didn't create a tall cake.  I wanted a tall, dramatic cake, so doubling the recipe was a must!

I didn't make the buttercream frosting that's on this site because it was WAY too many steps, and I just was not putting that much effort into frosting.  Whisking eggs over simmering water? No thanks.

I used this easy buttercream frosting recipe from Allrecipes.com and it turned out delicious.  I'm sure the Sprinkle Bakes recipe is delish and you won't be disappointed if you try it, but for those you who are lazy like I am, go with the Allrecipes one.

And then there was my bootleg copy of the Sprinkle Bakes cake.  Mine's not as pretty, but it tasted great!
I'm also looking to learn new tips and tricks for food photography.  I received a Canon EOS Rebel XS for Christmas/early birthday present (thank you again, Dad!), and I'm dying to take better pictures of everything I put on the blog for you, especially food.  If you know any tip sites or are a food photographer yourself, please email me or leave a comment!

08 February 2012

Baby Shower: The Spread

Today's baby shower installment is all about the spread!  This will be mostly pictures, and I'll post recipes for a few of the treats made later this week.


Check out that spread!  The shower was at 2 in the afternoon, so I opted for desserts and snacks.  The fruit salads and tomato tarts (I think that's what they're called) were made by three of the party's attendees.  Thank you again, ladies!  There were a few other treats brought, unfortunately there were no photos of the table once everyone got there.  There was just too much fun being had to remember picture taking!

The flowers were inexpensive bouquets from Publix.  The paper lanterns were purchased at Hobby Lobby.  I had originally planned to hang them, but ran out of time, so they became giant "bubbles" on the main table.


It was very convenient that the shower happened to be around Valentine's Day.   I had no problem getting colorful M&Ms.


The mom-to-be requested something of the peanut butter and chocolate variety, so I whipped up some from-the-box brownies and drizzled melted peanut butter on top before baking.


It wouldn't be a party without oatmeal chocolate chip cookies.  Just sayin'.  I live and die by the OCCC.


This is the first time I've made a pinwheel cookie, and they were easy and yummy.  These have orange peel in the dough and crushed pecans, cranberries, and brown sugar in the filling.


This cake was my baby.  Cherry-almond cake with vanilla buttercream frosting.  Sadly, I have no pictures of the inside, but it's PINK, which was the whole reason I decided to make it.  It was seriously yummy, as was the frosting.  I'll post a recipe for this one later this week, fo sho.  The heart toppers are from the Dollar Tree.

So that's the food spread.  In case you're wondering, the little glass ornaments floating around the table are bubbles.  They were super easy.  I'll post a little how-to for those in this series, as well.

06 February 2012

Baby Shower: DIY Sugar Scrub

The second installment in the baby shower series is the Thank You gift everyone at the party received for coming: Sugar Scrubs!


I knew when I decided on the bathtime theme that I wanted to give party favors that were a DIY bath product.  A sugar scrub seemed the easiest and least expensive.  Boom.  I was sold.


You'll need:

granulated sugar
raw sugar (turbinado sugar)
oil (mineral or vegetable oil)
essential oil
airtight container

1.  Mix together sugars in 1:1 ratio.  Because I was making a big batch for party favors, I mix 1 1/2 cup granulated sugar with 1 1/2 cup raw sugar.

At this point, all I really wanted to do was eat the sugar...It's so pretty!  And tasty!

2.  Pour oil into the sugar mixture.  I used olive oil because it was the only thing in the house and I was way too lazy to run out for the third time that day.  Add oil to make the mixture the consistency you want.  I poured a little bit of oil at a time and let it sink through the sugar.  Mix the oil and sugar together.  Add more oil as you desire.  If you add too much oil, just add more sugar in a 1:1 ratio.

Ohhh, pretty.
I sat and watched the oil sink in for a solid minute.  It was kind of mesmerizing.
3.  Add a few drops of your chosen essential oil.  I separated my mixture into two bowls to create two different  batches of scrub.  I had vanilla, per the mom-to-be's request, and "Pillow Potion", a lavender and hops blend.


4.  Spoon sugar scrub into your container.


I made the "Thank You"s with a cheap stamp and ink pad I bought at Hobby Lobby.  I stamped onto a sheet of pink card stock, cut around each stamp, and punched a hole in the top.  The little containers are from Hobby Lobby, as well.  I thought they were seriously cute and perfect for this project!

Forgive the bad lighting.  I did this one night while watching White Collar.

I would definitely recommend using this on your legs before you shave for an extra smooth shave.  Because of the large granules, I would not use this on my face.  Ouch!

01 February 2012

Baby Shower: Diaper Cake Tutorial

In place of today's usual Words on Wednesday, I thought I'd share the first in a series of baby shower posts!

One of my fellow Marine Corps wives is pregnant with her first child, a little girl.  I threw a baby shower for her this past weekend, and wanted to share a few details with you this week.  The official theme was bath time, but it was rather loose.  (I'd say the official "theme" was the colors pink, purple. and white!)

I was busy hosting, which to me meant being in constant motion, so the very sweet Elena took a bunch of pictures on the mom-to-be's camera.

I have decided to break up the baby shower into several posts over the next week or so.  The first post in the baby shower installment is my super awesome, super cute diaper cake!  (Totally tooting my own horn.  I know.)


I thought that this project was going to be much more difficult than it turned out to be.  It is actually quite simple and only took me an episode and a half of Gossip Girl.

Here's what you'll need to make a diaper cake:

double-sided tape
small and large rubber bands (I bought one bag of asst. rubber bands)
a sturdy base (I used some cardboard from one of the diaper boxes)
about 60 diapers (I used newborn sized diapers)
various ribbons
items to decorate the cake
large bottle of baby shampoo or wash
smaller bottle of baby powder
(depending on how large you want your diaper cake, you may want to select different sized bottles of baby product)

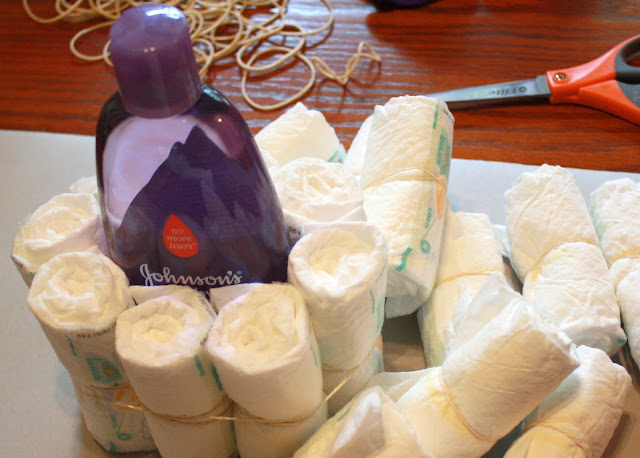
Begin by rolling the diapers individually, from back to front.  Secure them with a rubber band then form a ring around your large bottle of shampoo.  Secure the ring with a large rubber band.


Form two more rings of diapers around the first, securing each with a large rubber band.


Build a second tier on top of this one, except with only two layers of diapers.  Unfortunately, I got so into my diaper cake creating that I forgot to take pictures of the second and third tiers.  Check out this site for instructions with pictures for each step.

Place the second bottle of baby product on top of the first and keep it in place using a bit of double-sided tape.  Create one more tier of diapers (one layer deep) around this bottle.

You don't want the rubber bands showing in the final product, so use the tape to secure ribbon around the tiers.  I found my ribbons at the Dollar Tree.

Decorate the cake according to your theme.  The smaller bath toys were purchased at Target and the larger toys (turtle, hippo, & elephant) were found at Walmart.


And there you have it!  One diaper cake for an awesome mom-to-be.